Hello my beautiful people! So I want to start talking about some key, basic pieces to almost every woman's closet and what my take on it is and some places to find that item and variations of it.
Today's feature: the white tee!
Okay this basically is the epitome of the saying "small, but mighty" because it is the absolute most wearable item. It can be dressed up or down, or even worn on a slouchy "bum" day. I actually am a freak and don't own just a plain white tee, and I didn't realize how weird that was until I went to camp one summer. My friend recommended an outfit with a white tee and I was sort of lost for words. So, now to save you all from possible embarrassment at camp, and look at a closet staple: let's go!
1. Gap Women's Pocket Tee ($20)
Okay so this is by far my favorite minimal style of the white tee shirt, with just a baggy pocket that just adds a touch of carefreeness and effortlessness to the whole outfit. You could tuck it in a skirt or into a favorite pair of jeans, depending on what you want.
2. American Eagle Men's Legend V Neck ($16, 2 for $12.50 each)
Okay so I kinda love guy shirts. They're baggy, but not large and American Eagle is so comfy and cozy. This shirt combines the best of both worlds! And the womens's shirt is more fitted, but it's also like $20 so it depends on what you're going for. For this, my ideal outfit would be this shirt with a fitted blazer, with the cuffs rolled up tucked in a pair of favorite jeans and black heels. It can be played many ways, it just depends on your style.
3. American Apparel Ladies Tee Shirt
So American Apparel is kind of well known for their heavenly soft shirts and I'm wearing one right now and so much love for American Apparel. These are really nice quality and so comfy and breathable.
4. Urban Outfitters BDG V Neck ($15-18)
So I love Urban with every fiber of my being, and I have two of these V necks, one in a burnt orange and the other in an ideal blue. They are so wonderful! And I only got them for $5 each during their annual sale. Makes me wonder why I didn't buy more.. Regrets in my life! But these are really lovely.
Okay so those are my thoughts on our FIRST essential closet item, the great white tee! Thanks for reading lovelies, see you later with round 2! (Hopefully!) Ciao bellas! xx
Monday, January 14, 2013

Saturday, January 5, 2013
Sweet Sixteen Gift Ideas
Hi my wonderfuls! Hope you're all having a great start to 2013! So this is THAT year, the year when we complain that we can't drive, we can't get jobs, we have no life, and we turn sixteen! So these are just some gift ideas for people I would get them. And sorry guys, I don't really shop for guys so this is girl gift guide, say for like a sister, girlfriend, friend, etc. And it doesn't have to necessarily even have to be her sweet sixteen, these would work for a normal teenage birthday.
1. Techie friends (electronics lovers!)
Okay so this first one is for all those techie girls out there, slightly obsessed with their phones, laptops, etc.


Jewelry helps enhance the outfit and you can do no wrong here. Anything is good here; I have a few pictures of Betsey items and a Tiffany necklace. Other ideas could be a Pandora bracelet or a Dogearred one; they're really unique and very pretty. One last idea for the jewelry tester could be a couple months' subscription to Jewelmint, which is an online service that sends you a piece of jewelry every month for a certain price and if you like it, you can keep or return it and not pay that month. It would be nice for them to see a few pieces and decide on what they like. For fashion, it doesn't have to necessarily be clothes, it can be books, jewelry, scarves, gift cards to stores they like, etc.
3. Comfy Lover
Comfort is my favorite thing on this planet and I just enjoy gifts like this.
So good ideas would be onesies (since everyone apparently loves them right now), soft blankets, movies to watch, candy, a mug with hot chocolate mix, anything the person generally likes can be changed into a gift.
Well these are just some ideas, I'll put up more at a later time! Tell me what you think about these ideas and I hope this helps you! You can find something for everyone, these are just some suggestions! Have a good day!
1. Techie friends (electronics lovers!)
Okay so this first one is for all those techie girls out there, slightly obsessed with their phones, laptops, etc.


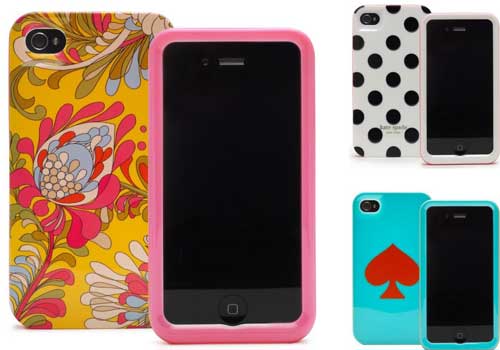
These are a few of Kate Spade's iPhones cases, they're super cute, really sturdy, and made to last. She also has iPad cases and laptop cases, you know the drill. And the design is definitely unique, and it would be easy to find one to match everyone's certain style and likes. There also are really cute ones with phrases and hashtags, and they are so adorable. Okay, now on to the other part of the gift; I would most likely get one of the phone cases along with these beauties.

These are the Monster Beats by Lady GaGa in case you are unfamiliar with these, and these can be a bit pricey, but really worth it. So for the gift, I would throw together the phone case, the earphones, and a card and I'd be all set for the tech-loving friend.
2. Fashionista
This one can be tough especially if you don't know their sizes or style so I have a few options that don't require clothing (unless you really know they want something!).

Lauren Conrad is so well-known for her put together style and how she can effortlessly pull off everything! She's kind of my biggest fashion idol. But her book Style is a really interesting fashion book; it's chock full of tips, styling guides for different tastes, and just outfit ideas along with some other things. It's perfect for that girl who adores fashion and is always looking for a little outfit inspiration.


Jewelry helps enhance the outfit and you can do no wrong here. Anything is good here; I have a few pictures of Betsey items and a Tiffany necklace. Other ideas could be a Pandora bracelet or a Dogearred one; they're really unique and very pretty. One last idea for the jewelry tester could be a couple months' subscription to Jewelmint, which is an online service that sends you a piece of jewelry every month for a certain price and if you like it, you can keep or return it and not pay that month. It would be nice for them to see a few pieces and decide on what they like. For fashion, it doesn't have to necessarily be clothes, it can be books, jewelry, scarves, gift cards to stores they like, etc.
3. Comfy Lover
Comfort is my favorite thing on this planet and I just enjoy gifts like this.
So good ideas would be onesies (since everyone apparently loves them right now), soft blankets, movies to watch, candy, a mug with hot chocolate mix, anything the person generally likes can be changed into a gift.
Well these are just some ideas, I'll put up more at a later time! Tell me what you think about these ideas and I hope this helps you! You can find something for everyone, these are just some suggestions! Have a good day!
Wednesday, January 2, 2013
Hormonal Acne 101
Hi my lovelies! Alrighty ladies, besides Mother Nature's gift of the month, your face also presents a gift:overly active skin which then can lead to hormonal acne.
Okay so what causes hormonal acne?
Usually, our faces have a normal amount of something called androgens that produce oil on our faces which is normal. Then during TOM (time of month) the androgens, which are hormones, go crazy causing acne flares that come along as well.
Some ways to treat hormonal acne:
1. The toothpaste trick. If you really need to leave but have a zit, dab some toothpaste on it and wait for ten minutes and wash off. PAT skin dry or it'll be easily irritated. The swelling and redness should go down, and this is a good quick fix.
2. Clean and Clear Advantage Acne Face Wash. So I used to use the toothpaste trick until my face had an allergic reaction to it and broke out so bad. So I picked this face wash up and it works miracles, I'm convinced. I use it in the morning and at night and perfecto! Gone in a few days.
3. Exercise. It produces sweat so the toxins are expelled from your body and it helps you keep the cramps at bay too. And you get in shape all at the same time!
4. Water. It will constantly flush all the bad stuff out of your system and help regulate the androgens better.
Okay well there are some tips for dealing with hormonal acne! Hope you enjoyed, bye!
Tuesday, January 1, 2013
Lookalike: Steve Madden Troopa Boots
Hi my lovelies! Happy New Year and may this year be great for all of you. Okay now let's talk Steve Madden. Troopa boots are pretty infamous right now, known for their design and also for the price tag that goes along with them. Haven't seen them yet? Now you will have.  Okay so they're pretty great, and I'm sure a lot of people have already given in and paid the $100 for them, but as a student that kind of money could pay for way more stuff than one pair of super cute boots. So how about some lookalikes for less?

1.FOREVER 21 ($34.80)
Okay, so these are the Forever 21 ones and pretty similar right? Maybe a few differences, but hey it would look weird if everyone was wearing the exact same pair of Troopas. These are only $34.80 so go for it!

2. PACSUN ($39.99)
Pacsun, you have pulled through again! So at first glance, I thought they were almost Troopas! And Pacsun quality is always nice, so these would be a good pair of lookalikes for only $39.99!

3. PACSUN ($34.99)
So these aren't necessarily Troopas but they are cute if you like a spin on the classic combat boot. It's got a little heel and crochet detail but the same main guidelines as combat boots with the laces. Just another option for all the daring.

4. ASOS ($52.75)
These are the New Look Clark Lace Up Worker Boots, and the lookalike that I found on ASOS which I love by the way. But these are nice, and really good quality. ASOS is spot on. Just saying. But these are a little pricey compared to the others but I'm sure you'll get your money's worth out of these.

5. SWEET BEAUTY ($47.99)
Beforehand, these are online so you might have to pay additional money for tax and shipping and all that, just to let you guys know. And again, these are for the ones okay with not-exactly Troopa style boots, because these have a little something something extra: the folded over pattern which is so cozy looking and very plaid. But these are just a variation that you could try out if you like it.
And okay, those are some lookalikes I found to fit different styles of people, but still go along with the Steve Madden Troopa craze. Tell me what you guys think and have a wonderful 2013!
 Okay so they're pretty great, and I'm sure a lot of people have already given in and paid the $100 for them, but as a student that kind of money could pay for way more stuff than one pair of super cute boots. So how about some lookalikes for less?
1.FOREVER 21 ($34.80)
Okay, so these are the Forever 21 ones and pretty similar right? Maybe a few differences, but hey it would look weird if everyone was wearing the exact same pair of Troopas. These are only $34.80 so go for it!
2. PACSUN ($39.99)
Pacsun, you have pulled through again! So at first glance, I thought they were almost Troopas! And Pacsun quality is always nice, so these would be a good pair of lookalikes for only $39.99!
3. PACSUN ($34.99)
So these aren't necessarily Troopas but they are cute if you like a spin on the classic combat boot. It's got a little heel and crochet detail but the same main guidelines as combat boots with the laces. Just another option for all the daring.
4. ASOS ($52.75)
These are the New Look Clark Lace Up Worker Boots, and the lookalike that I found on ASOS which I love by the way. But these are nice, and really good quality. ASOS is spot on. Just saying. But these are a little pricey compared to the others but I'm sure you'll get your money's worth out of these.
5. SWEET BEAUTY ($47.99)
Beforehand, these are online so you might have to pay additional money for tax and shipping and all that, just to let you guys know. And again, these are for the ones okay with not-exactly Troopa style boots, because these have a little something something extra: the folded over pattern which is so cozy looking and very plaid. But these are just a variation that you could try out if you like it.
And okay, those are some lookalikes I found to fit different styles of people, but still go along with the Steve Madden Troopa craze. Tell me what you guys think and have a wonderful 2013!
Sunday, December 30, 2012
DIY QUOTE SCARF: as seen on Pinterest and also by We Are Owls
Hi my wonderful little halcyons, today I'm DIYing it out for you guys by showing how to make this quote scarf. It's cute and adds originality to a basic closet staple. P.S. It makes a really good gift for all those book worms out there; just pick a quote from a favorite book and you're good to go!
Okay what'll you need:
1. A scarf (well duh. I got mine for like $5.)
2. Fabric markers (I used the Stained by Sharpie kind. Around $7 for four.)
3. Some sort of surface to work on as well as something to put under the scarf so the marker doesn't bleed through.
4. An iron
Let's go to work!
So first you should pick a quote to write on the scarf and scarves are quite large or small depending on what you buy so keep that in mind. I chose one from The Book Thief because this is a gift for someone (PROCRASTINATOR ALERT!) It's "He was the one who painted himself black and defeated the world. She was the book thief without the words. Trust me, though, the words were on their way and when they arrived, Liesel would hold them in her hands like the clouds, and she would wring them out like rain."
Alright so get out your fabric markers, and test them with a few words just in case. I did like the Stained by Sharpie ones if you need some. Put the scarf on the surface and start writing! It may take a few tries for it to be truly dark. After you're done, wait for it to dry and then iron on low to set the ink. And voila, done!
Have fun looking chic and warm this winter! Happy New Year!
Friday, December 28, 2012
Let's Talk: Beachy Hair and How to Kinda Get it!
Hello my beautifuls! So as a lazy teenager,I know firsthand that quick, effortless looking, and cute are three words I like to hear about ways to do my hair. I don't even know anyone who actually goes to the effort of straightening/curling their hair on a daily basis, probably because I'm a nerd but anyway.
So let's talk beachy hair. It's glamorously messy and bed-heady and everyone rocks it from celebs to well, students. It looks effortless and a tad of unkempt, but still under control. Okay so how do we get it?
There are a few factors first..
1. Your natural hair. If it's already curly, kudos to you! I'm so madly jealous. I, on the other hand, have semi-straight hair with occasional kinks and waves. Crazy right? The only Asian who doesn't have super curly hair or pin straight hair.
2. Frizz
Agh the dreaded F word. It can really mess up a good hair day. But if your hair is super frizzy and you can tame it with some serum, you're good to go my friend!
3. Holdability?
How well your hair can hold waves or products is pretty big, at least for us straight hair people. Within a few hours, my hair straightens back out, and it just doesn't look as good.
Okay so let's get the hair going!
This is what I do, you don't have to do it this way!
So usually I have a couple ways of getting beachy hair.
1. Wake up with Pre-washed hair. Spray in Not Your Mother's Beach Babe Spray (Smells so yummy!) and scrunch. After, get a little of FX's Surf Head paste and scrunch that through too. Bam! Done. This is what I do when I run super super late.
2. Wave your hair with a curling wand loosely and then spray the same sea salt spray and then scrunch and go!
3. The night before after washing your hair (NOTE: NO DIRTY HAIR. It doesn't turn out well. At least not for me.) dry it to semi-dry, and then split hair in half. Twist away from your face and then twist it into a little bun. The next morning, take the ponytail holders out and shake out the waves!
4. The finger curl method. So start with washed dry hair(I usually put in some of John Frieda's Curl Enhancing mousse) and take two fingers and wrap about an one inch section of hair around it and then secure with a bobby pin. Repeat around your head until all hair is up. The next morning, take the bobby pins out and voila! I usually sleep on my hair like this but the curls end up being crazy! If you like it like that, go for it! I usually take them out and then fishtail my hair. After a few hours I take the braid out and it looks so pretty!
Okay so those were some ideas of mine, I hope you liked them! Tell me if they worked! Until next time!
Saturday, December 22, 2012
DIY Galaxy Vans
Hey hey, what's cooking good-looking? Haha anyway, today I'm going to show/tell you how I made galaxy Vans.
Quick note, does it bother anyone that most people don't use actual Vans? I used my actual ones, carpe diem. (No YOLO's here.)
BEFORE: So my vans are just normal ones, black with blue lining. And now it's time for the magic.
WHAT YOU'LL NEED: 1. Blue, purple, and pink acrylic paint
2. Tape, preferably duck or masking.
3. A paintbrush
4. Silver/white paint for the stars (optional)
5. Glitter glue (also optional)
Let's get down to business!
So first I taped the white plastic-y parts of my Vans, and any other areas I didn't want the paint to get on. I would recommend this so your shoes don't look super paint splattered after.
Then the painting started. I painted with blue first and covered every part with blue since it's like my "main" color for the shoes. Then I sponged until I found the optimal effect/texture I liked. And then I added pink and purple but just in concentrated areas like clouds almost., and sponged and faded accordingly. One bit of advice: don't layer on a bunch at once! It'll be hard to remove the paint once it's dried on, and acrylic dries pretty fast on Vans. Unless you like that kinda thick all-over color. I don't know, that's just what I try to avoid.
Okay so the painting is done, and I set them over an air conditioning vent in my house but you can leave them anywhere to dry. Afterwards when they were dry, I restrung the shoelaces and then I got the glitter glue and just painted it on (not in thick layers) just here and there. And then I waited again. Bam! Now white/silver paint time. You can use either or neither depending on what you like. I painted some spots just dots and others, thin "addition" signs and then I waited for it to dry. And there you have, diy galaxy vans! I'll upload the finished picture later, I'm out and about right now.
Thanks loves! Have fun!
Subscribe to:
Posts (Atom)